2012年5月23日 星期三
How to detect (and execute macro) the value change in specific cell in Excel
Private Sub Worksheet_Change(ByVal Target As Range)
If Not Intersect(Target, Sheets("Sheet1").Range("Your range")) Is Nothing Then
Application.EnableEvents = False
'Do something here
Application.EnableEvents = True
End If
End Sub

2012年3月22日 星期四
Adding double quote in the if...then...else clause in mail merge
- Ctrl + F9 to add the { } to the code
- Type QUOTE 34 inside the { } added in step 1
- Done!

2011年8月10日 星期三
用iPhone 做 GPS Logger 及 Geotag 相片
上星期和朋友挑戰體能極限,由東涌騎單車入廸欣湖。因為路程不是傳統的單車徑,也沒有指示牌,所以忽發奇想,想寫一篇攻略,方便想挑戰這條路的大小朋友。
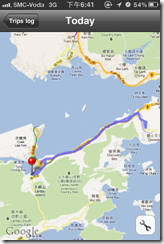
為了完成這個偉大,找來了一個不錯用的iPhone app,叫做 Geotag Photo Pro。
官方網址:http://www.geotagphotos.net/en/
AppStore 網址:http://itunes.apple.com/us/app/geotag-photos-pro/id355503746?mt=8
GPS Logging
要做GPS Log 的做法十分簡單,首先從AppStore 買下這個app,然後把它打開,以下是它的主畫面:
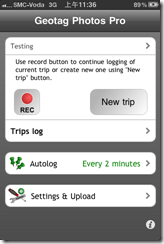
第一次先用按New trip,然後輸入一個行程名稱。

完成後返回主畫面,你可以先進入Autolog選項

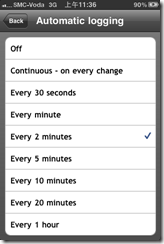
在這裡你可以選擇每隔多少分鐘記下GPS位置,上次騎單車我選了兩分鐘,但發現騎單車有時騎得快,結果記下來的不太準確。但注意如果調得太密,電量消耗會很大。(給大家作參考,我用的是3GS,再外接一顆MiPOW Power Tube 2200,有2200mAh 的後備電量,由早上十一時多到晚上八時多都沒大問題。)
再進入第二項 Settings & Upload
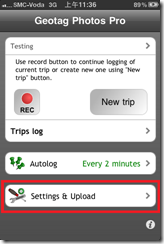
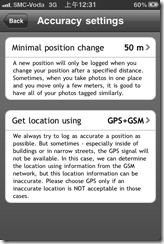
這裡有很多不同的設定,先看看Accuracy settings

第一項設定的也不知道,如果有朋友知道的請告訴我。第二項設定比較有用,預設它只會用GPS作為記錄的訊號,但如果身處室內,我建議還是設定為GPS+GSM,那定位會比較準確。
Notifications、Advanced Settings 和 Setup time on camera, 只是一些基本設定,這裡就略過不提了。Upload logged data 只是將你的GPS LOG 上載到官網那裡做Geotag,但由於官網有提供免費的offline Geotag 工具,所以這個選項也略過不提。
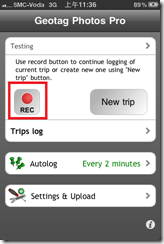
所有設定都完成了,那可以開始記錄行程了!先回主畫面,然後按REC ,那麼旅程就會開始記錄了。緊記旅程完結後也要停止記錄,不然你把你回家的路程也記錄了。
Geotagg 相片
要Geotag 相片,方法也很簡單,首是先進入 Settings & Upload ,然後進入 Link with Geotagphotos.net ,點選這裡會帶你到官網申請賬戶。
申請賬戶後,到官網,點選右上角的Geotag your photos now,然後登入賬戶。

登入後在右手面你會發現一個Geotag 工具的offline version,先下載它。
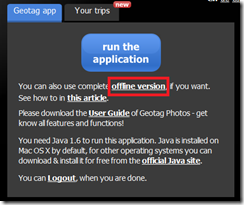
這個軟體是一個JAVA 程式 (runGeotagPhotosOffline.jnlp),所以你必需先安裝JAVA,如沒有裝請到這裡安裝:http://www.java.com/zh_TW/
安裝JAVA 後,打開軟體,它會問你要兩個東西:
1. GPX file
2. 要做Geotag 的相片所存放的位置

第二點對大家沒有難度,那第一點要如何那到GPX file 呢?方法也很簡單,先進入APP,然後選擇先前記錄好的LOG。

進入這個畫面後,選擇想滙出行程 (按右手面的藍色箭咀)。
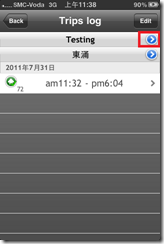
然後選 Export to Email ,之後到自己的電郵下載GPX 檔。

下在完成後,在 Geotag 軟體選好剛下載的GPX 檔,然後等軟體載入相片,然後按下 Geotagging ,軟體就會為你每張上片加入位置資訊。
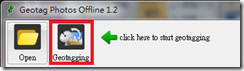
待所有相片處理完成後,你用一些支援定位的看圖軟件如 Picasa 打開相片,你就會看到相片的定位了!
謝謝收看!

為了完成這個偉大,找來了一個不錯用的iPhone app,叫做 Geotag Photo Pro。
官方網址:http://www.geotagphotos.net/en/
AppStore 網址:http://itunes.apple.com/us/app/geotag-photos-pro/id355503746?mt=8
GPS Logging
要做GPS Log 的做法十分簡單,首先從AppStore 買下這個app,然後把它打開,以下是它的主畫面:

第一次先用按New trip,然後輸入一個行程名稱。

完成後返回主畫面,你可以先進入Autolog選項

在這裡你可以選擇每隔多少分鐘記下GPS位置,上次騎單車我選了兩分鐘,但發現騎單車有時騎得快,結果記下來的不太準確。但注意如果調得太密,電量消耗會很大。(給大家作參考,我用的是3GS,再外接一顆MiPOW Power Tube 2200,有2200mAh 的後備電量,由早上十一時多到晚上八時多都沒大問題。)

再進入第二項 Settings & Upload

這裡有很多不同的設定,先看看Accuracy settings

第一項設定的也不知道,如果有朋友知道的請告訴我。第二項設定比較有用,預設它只會用GPS作為記錄的訊號,但如果身處室內,我建議還是設定為GPS+GSM,那定位會比較準確。

Notifications、Advanced Settings 和 Setup time on camera, 只是一些基本設定,這裡就略過不提了。Upload logged data 只是將你的GPS LOG 上載到官網那裡做Geotag,但由於官網有提供免費的offline Geotag 工具,所以這個選項也略過不提。
所有設定都完成了,那可以開始記錄行程了!先回主畫面,然後按REC ,那麼旅程就會開始記錄了。緊記旅程完結後也要停止記錄,不然你把你回家的路程也記錄了。

Geotagg 相片
要Geotag 相片,方法也很簡單,首是先進入 Settings & Upload ,然後進入 Link with Geotagphotos.net ,點選這裡會帶你到官網申請賬戶。
申請賬戶後,到官網,點選右上角的Geotag your photos now,然後登入賬戶。

登入後在右手面你會發現一個Geotag 工具的offline version,先下載它。

這個軟體是一個JAVA 程式 (runGeotagPhotosOffline.jnlp),所以你必需先安裝JAVA,如沒有裝請到這裡安裝:http://www.java.com/zh_TW/
安裝JAVA 後,打開軟體,它會問你要兩個東西:
1. GPX file
2. 要做Geotag 的相片所存放的位置

第二點對大家沒有難度,那第一點要如何那到GPX file 呢?方法也很簡單,先進入APP,然後選擇先前記錄好的LOG。

進入這個畫面後,選擇想滙出行程 (按右手面的藍色箭咀)。

然後選 Export to Email ,之後到自己的電郵下載GPX 檔。

下在完成後,在 Geotag 軟體選好剛下載的GPX 檔,然後等軟體載入相片,然後按下 Geotagging ,軟體就會為你每張上片加入位置資訊。

待所有相片處理完成後,你用一些支援定位的看圖軟件如 Picasa 打開相片,你就會看到相片的定位了!
謝謝收看!
2011年8月9日 星期二
[教學] 在 eclipse 裡設定 JQuantLib 的開發環境 (Setup JQuantLib in eclipse)
工作需要,這幾天都在研究一套JAVA 的Quantative finance library – JQuantLib。
因為暫時只是在POC階段,所以先寫安裝方法,不寫這套library 的內容。
我的開發環境:
- J2SE 1.5.0_22
- Eclipse Helio (service release 2)
在eclipse 的設定方法 (假設大家都懂得如可在eclipse 加入新插件):
- 安裝 Maven Integration for Eclipse
Maven 與 Eclipse 的 integration
Eclipse update url: http://download.eclipse.org/technology/m2e/releases - 安裝 Subversive
打開 Help > Install New Software... > select Helios - http://download.eclipse.org/releases/helios > Collaboration Tools,安裝以下一堆plug-in
安裝完成後會有對話框詢問你要裝甚麼connector,我沒有理會,通通都把它裝起來。 - 安裝 FingBugs
Description: Tools that analyse your code and point out the place that you may got a bug or have a bad practise.
Eclipse update url: http://findbugs.cs.umd.edu/eclipse/ - 安裝 PMD
Description: Help to find bad constructions in the code, either those commonly known or those defined by JQuantLib.
Eclipse update url: http://pmd.sf.net/eclipse - 安裝 EclEmma
Description: Tools for easy verify of the code coverage of your JUnit test cases.
Eclipse update url: http://update.eclemma.org/ - 設定 JQuantLib SVN Repository
- Right click 有關的project,然後 New > Other,然後選SVN > Repository Location.
- 在URL輸入http://jquant.svn.sourceforge.net/svnroot/jquant/trunk/jquantlib,然後按Finish。
- 要加入的Repositories 有以下五個:
http://jquant.svn.sourceforge.net/svnroot/jquant/trunk/jquantlib
http://jquant.svn.sourceforge.net/svnroot/jquant/trunk/jquantlib-all
http://jquant.svn.sourceforge.net/svnroot/jquant/trunk/jquantlib-parent
http://jquant.svn.sourceforge.net/svnroot/jquant/trunk/jquantlib-helpers
http://jquant.svn.sourceforge.net/svnroot/jquant/trunk/jquantlib-samples - Check out JQuantLib source
- 打開Window > Show View > Others,點選 SVN Repositories。
- 在SVN Repositories 的 view 入面,right click 剛新加入的repositories,然後選Find/Check Out As…。
- 然後選 Check out as a project with the name specified:,然後按Finish。
- Check out in progress ……
- 重覆以上步驟直到所有repositories 都check out 完成。
- 完成!


Reference:
http://www.jquantlib.org/index.php/JQuantLib_Users_Guide#Install_plugins
http://www.jquantlib.org/index.php/Checkout_in_Eclipse_with_SVN
2011年7月28日 星期四
Google+ & Facebook 同步發表 (sync post)
Google+的確是十分好用,但可惜的是暫尚未普及,所以暫時還不能放棄facebook。
今期 e-zone (676期) 送了一本Google+的小册子,其中有一個不錯用的Chrome extension ,可以將google+的帖子同時分享至facebook (or twitter),所以在這裡轉貼一下。
Google+ & Facebook 同步發表拓展
https://chrome.google.com/webstore/detail/aamklbolfkledofgpbdllkangemkfdnb?hl=zh-TW
安裝方法:
今期 e-zone (676期) 送了一本Google+的小册子,其中有一個不錯用的Chrome extension ,可以將google+的帖子同時分享至facebook (or twitter),所以在這裡轉貼一下。
Google+ & Facebook 同步發表拓展
https://chrome.google.com/webstore/detail/aamklbolfkledofgpbdllkangemkfdnb?hl=zh-TW
安裝方法:
- 進入這個extension的主頁,在右下角選安裝
- 安裝程序簡單,不用數秒就已完成,然後你會發現Chrome 和Google+的右上角分別多了一個icon。
- 假如安裝時,你已經登入了facebook,你按ctrl + F5 重新整理你的頁面後,你會發現在分享信息是多了facebook 的選項。
- 只要你選了facebook,那你發佈到Google+ 的信息就會同時發佈到facebook。
- 設定方面你可以在chrome 按一下右上角的
,就可以設定Google+ 和 facebook 賬戶的連結。


Printing multiple word documents with duplex settings in windows XP
Here is the steps:
- Open any one of the word document, the go to File –> Print.
- Then set the printer properties you want, like print on both sides, pages per sheet, etc.
- Print the first document as normal.
- Then keep the first document open, don’t close it. Right click on the others file you want to print.
On the menu, click on Print. - A new word window will pop up and disappear immediatly. The file will be printed with the printer setting of the 1st document.
- Repeat step 4 for all other file you want to print. In this way, you don’t need to open the word document one by one and select the print function.


Enjoy!
2011年7月17日 星期日


2011年7月14日 星期四
Use IE Tab on Chrome
因為毛毛公司要用到Outlook Web,自己維護的系統也要用到Internet Component Download,所以迫不得已要用IE。
要同時用IE和chrome很煩人,而且近期發現一個怪現象,就是我晚上log off 了windows 後,第二朝回來log in總總發現IE會吃掉我大部分系統資源,每天早上都要強迫我使出「ctrl + alt + del」大法……
這天早上「的起心肝」找找有沒有在chrome上用IE engine的方法,發現了一個很好用的extension:Chrome IE Tab Multi
https://chrome.google.com/webstore/detail/fnfnbeppfinmnjnjhedifcfllpcfgeea?hl=zh-TW
安裝後chrome 右上角會多了一個 IE 的icon:

每次你想在chrome開IE 的網頁,只要按一下這個icon,新開的tab 就會變成IE 的tab:

測試了Outlook web 和商台的網上直播都沒有問題,暫時我想我可以將IE 放在一旁了!
在XP 設定與天文台的Internet Time同步 (command line)
這兩天發現辦公室的電腦時間DELAY 了後多,經調查後懷疑公司DOMAIN SERVER 的時間有誤,所以希望把電腦時鐘和天文台的標準時間同步,一般電腦的設定如下:
http://www.hko.gov.hk/nts/Xp-syncc.htm
可是問題來了,由於公司電腦已經加入了domain,所以沒有「網際網絡時間」的選項……
幸好有Google 大神,原來可以透過command line 的方法來設定和天文台的時間同步,方法如下:
http://www.hko.gov.hk/nts/Xp-syncc.htm
可是問題來了,由於公司電腦已經加入了domain,所以沒有「網際網絡時間」的選項……
幸好有Google 大神,原來可以透過command line 的方法來設定和天文台的時間同步,方法如下:

- net time /setsntp:stdtime.gov.hk
- net stop w32time
- net start w32time
- 等5-10分鐘左右,你會發現你的時間會自動和天文台同步了
Internet Component Download - INF File Architecture
Introduction
An information file (.inf) provide the installation instruction for IE to setup and register your software distribution. It consists of any number of name section. And each section can have multiple items.
Each section will have its own predefined purpose, such as updating the registry, executing a command, copying some file, etc.
Main Sections of an INF File in Internet Component Download:
An information file (.inf) provide the installation instruction for IE to setup and register your software distribution. It consists of any number of name section. And each section can have multiple items.
Each section will have its own predefined purpose, such as updating the registry, executing a command, copying some file, etc.
Main Sections of an INF File in Internet Component Download:
- [Add.Code]
This section lists all the files to be installed, including optional files[Add.Code]
filename1=section-name1
filename2=section-name2 - [Setup Hook]
This section lists all hook that will be executed before setting up files in [Add.Code] section.[Setup Hooks]
hookname1=section-name4
hookname2=section-name5
[hookname1]
run=extrac32.exe /e /a /y /l c:\MyApplication\client MyApp.cab - [Version]
For compatibility, the following lines must be added if we use hooks[Version]
Signature="$CHICAGO$"
AdvancedINF=2.0 - [DefaultInstall]
Installation section that is executed by default. Contains pointers to other sections specifying files to copy and delete, registry updates, .ini file updates, and so on. (for full list of pointer and the systax of this section please refer to here)
In this post we will just talk about AddReg. AddReg pointer point to a section for adding subkeys or value names to the registory, optionally setting the value.[DefaultInstall]
AddReg=AddRegSection
[AddRegSection]
HKLM,Software\MyApp,ProgramName,,"My Application"
HKLM,Software\MyApp,"Program Location",,"%25%\MyApp.exe" - [Strings]
Defines one or more strings keys. The Installer expands the strings key to the given string and uses it for further processing. You must enclose a strings key in percent signs (%).[String]
String0=”MyApplication”
String1=”Read me”
Reference:
Setup Information File (.inf) Definition
About INF File Architecture
2011年7月11日 星期一
Value at Risk (VaR) – study notes 1
Value at risk (VaR) is a technique used to estimate the probability of portfolio losses based on the statistical analysis of historical price trends and volatilities. It is commonly used banks and security firms.
VaR contains three components:
- a relatively high level of confidence (typically either 95% or 99%)
- a time period (a day, a month or a year) and
- an estimate of investment loss (expressed either in dollar or percentage terms)
A common statement used in VaR: What is the most I can - with a 95% or 99% level of confidence - expect to lose in dollars over the next month?
There are three common methods of calculating VaR:
- The historical method
- The variance-covariance method
- The Monte Carlo simulation
The following is an sample implementation of a single stock VaR (download it and run the macro in your local PC).
I would not go into the detail of these three methods, but if you want to know more I suggest you may read John C. Hull reading. Or there is some good online tutorial on finance in the following youtube channel:
http://www.youtube.com/user/bionicturtledotcom
Reference: http://www.mathfinance.cn/value-at-risk/
訂閱:
文章 (Atom)